


A readiness probe in Kubernetes is a mechanism that determines whether a container within a pod is ready to serve traffic. This is crucial for managing traffic flow to pods, ensuring that only those containers that are fully started and operational receive client requests, thereby increasing the reliability and availability of applications.
Readiness Probe Types
Kubernetes supports several types of readiness probes, each suitable for different situations:
HTTP Probe: Kubernetes sends an HTTP GET request to a specified path on the container's IP address. If the probe receives a response in the range of 200-399, it is considered successful, indicating that the container is ready.
TCP Socket: This probe tries to establish a TCP connection with the specified container port. If it can establish a connection, the container is considered ready.
Exec: Executes a specified command inside the container. If the command exits with status code 0, the probe is considered successful, indicating that the container is ready.
Readiness probes are defined in the pod's configuration file under the readinessProbe field. The readiness probe checks start after the container starts, and they continue to run throughout the container's lifecycle. If a readiness probe fails, Kubernetes stops routing traffic to the pod until it passes again, but it does not kill or restart the container. This behavior is distinct from liveness probes, which are used to restart containers that are not working correctly.
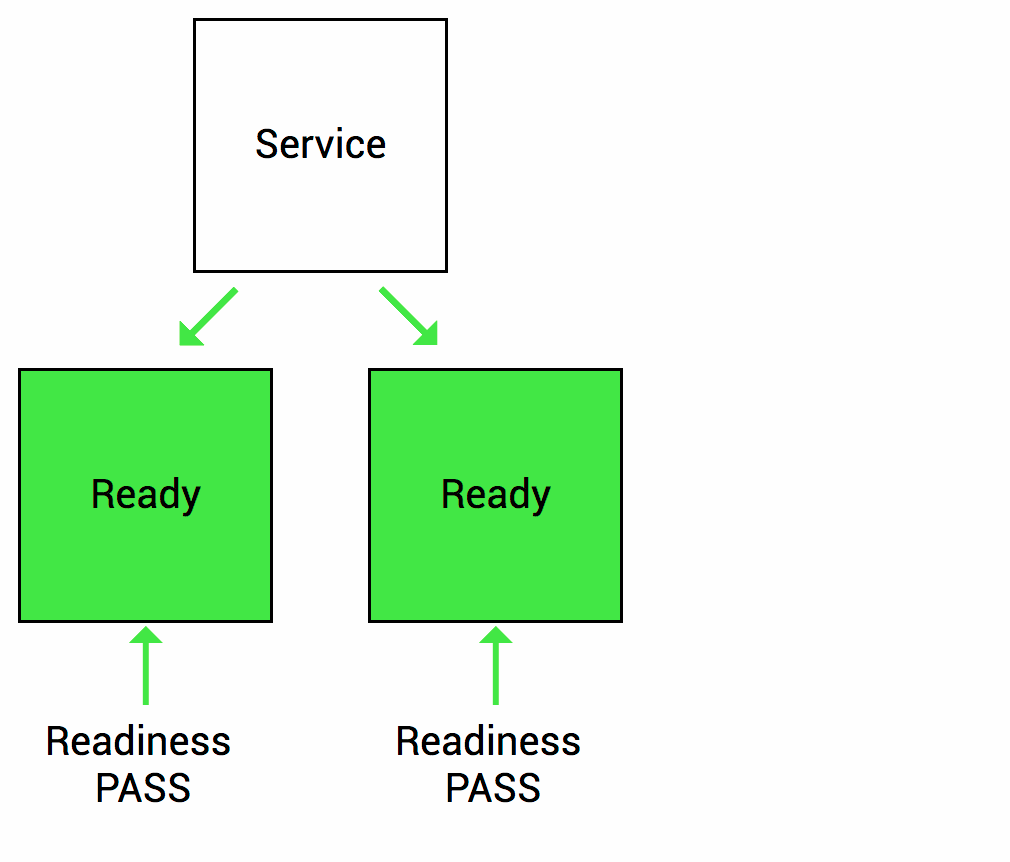
Image credits: Sandeep Dinesh
Readiness Probe Parameters
Below is an example of a Kubernetes Pod configuration that includes a readiness probe. This example uses an HTTP GET request as the readiness probe type:
apiVersion: v1
kind: Pod
metadata:
  name: my-app-pod
  labels:
    app: my-app
spec:
  containers:
  - name: my-app-container
    image: myapp:1.0
    ports:
    - containerPort: 80
    readinessProbe:
      httpGet:
        path: /health
        port: 80
      initialDelaySeconds: 5
      periodSeconds: 10
      timeoutSeconds: 1
      successThreshold: 1
Here's what each field under readinessProbe means:

httpGet: Specifies that this is an HTTP GET probe.pathandportspecify where the probe will send requests to check if the container is ready.initialDelaySeconds: Number of seconds after the container has started before the probe is initiated. This allows your application to have enough time to start up before the readiness checks begin.periodSeconds: How often (in seconds) to perform the probe. Default is 10 seconds. The minimum value is 1.timeoutSeconds: Number of seconds after which the probe times out. Default is 1 second.successThreshold: Minimum consecutive successes for the probe to be considered successful after having failed. Defaults to 1. Must be 1 for liveness and startup Probes.failureThreshold: When a probe fails, Kubernetes will tryfailureThresholdtimes before giving up. Giving up in case of a readiness probe means the Pod will be marked as not ready/healthy/live.
This example sets up a readiness probe that sends an HTTP GET request to the /health endpoint of the application running inside the container. Kubernetes starts checking the readiness 5 seconds after the container has started, then checks every 10 seconds. If the application does not respond within 1 second, or if the HTTP response code is outside the 200-399 range, Kubernetes considers the probe to have failed. If the probe fails three times (the failureThreshold), the container is marked as Unready, and it won't receive traffic until it starts passing the checks again.
TCP Readiness Probe Example
Here's an example of a Kubernetes Pod configuration that includes a TCP Socket readiness probe. This type of probe attempts to establish a TCP connection to the specified container port. If the connection is successful, the container is considered ready to accept traffic.
apiVersion: v1
kind: Pod
metadata:
  name: my-tcp-app-pod
  labels:
    app: my-tcp-app
spec:
  containers:
  - name: my-tcp-app-container
    image: mytcpapp:1.0
    ports:
    - containerPort: 12345
    readinessProbe:
      tcpSocket:
        port: 12345
      initialDelaySeconds: 5
      periodSeconds: 10
      timeoutSeconds: 1
      successThreshold: 1
      failureThreshold: 3
tcpSocket: Specifies that this probe uses a TCP socket. Theportfield indicates the container port the probe will try to connect to.
This configuration defines a readiness probe that checks if a TCP connection can be established with the container's port 12345. After the container starts, it waits 5 seconds before starting the readiness checks, then performs the check every 10 seconds. If a probe fails (i.e., if it cannot establish a TCP connection within 1 second), Kubernetes tries up to three times before marking the container as not ready.
Exec Readiness Probe Example
Here's an example of a Kubernetes Pod configuration that includes an Exec type readiness probe. This type of probe executes a specified command inside the container. If the command exits with a status code of 0, the probe is considered successful, indicating that the container is ready to handle traffic.
apiVersion: v1
kind: Pod
metadata:
  name: my-exec-app-pod
  labels:
    app: my-exec-app
spec:
  containers:
  - name: my-exec-app-container
    image: myexecapp:1.0
    readinessProbe:
      exec:
        command:
        - check_script.sh
      initialDelaySeconds: 5
      periodSeconds: 10
      timeoutSeconds: 1
      successThreshold: 1
      failureThreshold: 3
In this example:
exec: Specifies that this probe uses an execution command inside the container.command: A list that specifies the command to run inside the container. The first element is the command itself, which in this case is a script namedcheck_script.sh. This script should be present in the container's file system and must be executable. The script should perform whatever checks are necessary to determine the readiness of the container and exit with status code 0 if the checks pass.
This configuration sets up a readiness probe that periodically executes a script named check_script.sh inside the container. If the script runs successfully (exits with code 0), the container is considered ready. The probe starts 5 seconds after the container starts and runs every 10 seconds. If the command times out (takes longer than 1 second to execute) or fails (exits with a non-zero status code), Kubernetes retries the probe up to three times before marking the container as not ready.
Best Practices for using Readiness Probes
Using readiness probes effectively in Kubernetes ensures that traffic is only sent to pods that are fully ready to handle requests, enhancing the reliability and stability of applications. Here are some best practices for using readiness probes:
Choose the Right Probe Type: Depending on the nature of your application, decide between HTTP GET, TCP Socket, and Exec probes. Use HTTP GET for web servers, TCP Socket for applications that listen on a port, and Exec for custom scripts that check internal states.
Set Reasonable Timings: Adjust
initialDelaySeconds,periodSeconds,timeoutSeconds,successThreshold, andfailureThresholdaccording to your application startup characteristics and behavior. Avoid setting these values too low, as doing so might mark services as ready before they are actually ready or vice versa.Avoid Heavy Operations in Exec Probes: If using an Exec probe, ensure the script or command is lightweight and does not significantly impact the container's performance. The probe should execute quickly to avoid timeouts and unnecessary resource consumption.
Use Readiness Probes for Dependency Checks: If your application depends on external services (databases, APIs, etc.), you can use readiness probes to check the availability of these services before marking your application as ready. This ensures that your application only starts receiving traffic when it's fully operational.
Handle InitialDelay Wisely:
initialDelaySecondsgives your application time to start up before the readiness probes begin. Set this value based on the average startup time of your application to avoid marking it as ready too early or too late.Adjust Timeout and Threshold Values Appropriately:
timeoutSecondsshould be set based on the expected time for a probe to complete.failureThresholdandsuccessThresholdcan be adjusted to avoid flapping (frequent status changes between ready and not ready).Keep Liveness and Readiness Probes Separate: While it's tempting to use the same checks for both liveness and readiness probes, they serve different purposes. Liveness probes ensure the container is running correctly, while readiness probes check if the application is ready to serve traffic. Differentiating the probes allows for more refined control over container management.
Ensure Idempotency of Exec Commands: For Exec probes, ensure the command or script is idempotent, meaning it can be safely run multiple times without changing the system's state beyond the initial application.
Monitor and Log Probe Status: Implement logging within your readiness probe checks if possible, especially for Exec probes. Monitoring probe status and failures can provide insights into application behavior and help with troubleshooting.
Gradually Roll Out Changes: When introducing or adjusting readiness probes, roll out the changes gradually to monitor the impact on application availability and stability. Use canary deployments or similar strategies to ensure the new configuration works as expected.
By following these best practices, you can ensure that readiness probes effectively contribute to the smooth operation of your Kubernetes-managed applications, improving overall service reliability and user experience.
Use Cases for Readiness Probes:
Readiness probes in Kubernetes serve several important use cases, each enhancing the reliability, stability, and efficiency of applications deployed in containers. Understanding these use cases can help you better design and manage your deployments. Here are some of the key use cases for readiness probes:
Gradual Application Startup: Some applications require time to load data, compile resources, or perform other initialization tasks before they can handle traffic effectively. Readiness probes ensure that these applications don't receive traffic until they're fully ready, preventing errors and timeouts for users.
Dependency Readiness: Applications often depend on external services like databases, message brokers, or other APIs. Readiness probes can check the availability of these dependencies, ensuring that the application does not start handling requests until all necessary external services are available.
Configuration Changes: When an application requires reconfiguration or dynamic feature flag updates, readiness probes can be used to temporarily remove a pod from the service pool until it's reconfigured and ready to serve traffic again, ensuring seamless updates without affecting users.
Resource Intensive Workloads: For applications that perform heavy initialization tasks consuming significant CPU or memory, readiness probes prevent the pod from being overwhelmed with traffic while it's still in a resource-constrained state during startup.
High Availability and Failover: In high-availability deployments, readiness probes help manage traffic failover between instances by only routing traffic to instances that are ready to handle requests. This is crucial for maintaining service availability in the event of failures or during deployments.
Load Balancing: Readiness probes work with Kubernetes' service discovery and load balancing to ensure that traffic is only sent to pods that are ready to handle it. This improves load distribution across multiple instances of an application.
Zero Downtime Deployments: During rolling updates, readiness probes help achieve zero downtime by ensuring that new pod versions are ready to handle traffic before old ones are terminated. This allows for seamless updates and upgrades of applications without affecting user experience.
Health Checks for Stateful Services: For stateful services where specific instances handle specific sets of data or tasks, readiness probes ensure that a pod is fully operational and has successfully loaded its state or data before it starts serving traffic.
Dynamic Scaling: Readiness probes assist in horizontal pod autoscaling scenarios by ensuring that newly created pods are fully ready before they are added to the load balancer pool, optimizing resource utilization and response times.
Service Mesh Integration: In environments using a service mesh, readiness probes help manage the flow of traffic through the mesh by ensuring that services are ready to handle requests, which is key for implementing complex traffic management and routing rules.
By leveraging readiness probes across these use cases, teams can significantly improve the robustness and efficiency of their deployments, ensuring that services remain available and responsive under various conditions.