Overview:
This post shows how quickly to start up with RabbitMQ and Celery on your local machine based on Ubuntu 20.04
Testbed:
- Ubuntu 20.04
- Python 3.8.10
- Celery 5.2.6 (dawn-chorus)
- RabbitMQ 3.8.2
Core concepts:
- Celery is an asynchronous task queue. It can be used for anything that needs to be run asynchronously. It uses so-called workers to execute jobs from queues.
- RabbitMQ is a message broker. It is widely used with Celery. RabbitMQ acts as a message transport (broker)
Basic scheme:

Explanation:
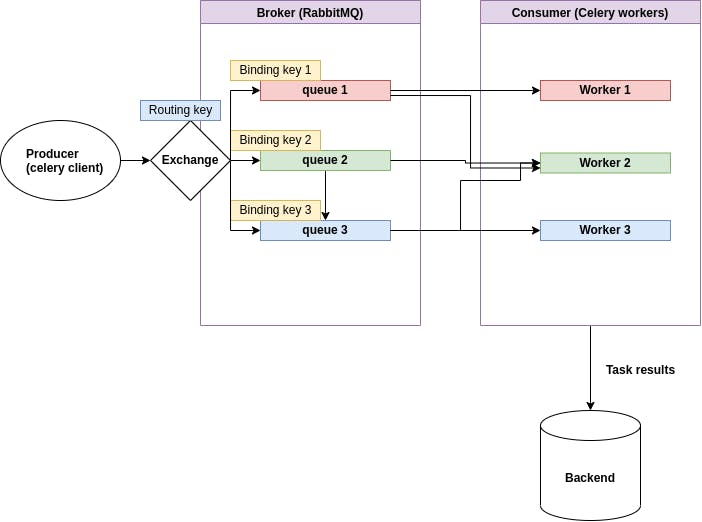
- Producer emits messages to exchange
- Consumer receives messages from the queue
- RabbitMQ uses so-called Bindings to connect an exchange with a queue by using binding key
- Exchange routes the tasks by comparing his routing key with the binding key of the incoming task message
- By default RabbitMQ uses a special nameless exchange that is created automatically and compares the routing key with the queue name
Project initialization
- Create a project folder:
mkdir test_celerycd test_celery - Install RabbitMQ server:
To completely remove rabbimq (optional) from your machine:sudo apt-get install rabbitmq-serversudo apt-get remove --auto-remove rabbitmq-serversudo apt-get purge --auto-remove rabbitmq-server - Create a Python virtualenv:
Start:virtualenv venv
To deactivate (optional) use:source venv/bin/activatedeactivate - Install celery:
pip install celery - Configure RabbitMQ for Celery. Create a virtual host, user and set permissions:
Add a user with a password:
Add virtual host:sudo rabbitmqctl add_user maxat password123
Set user tag:sudo rabbitmqctl add_vhost maxat_vhost
Set permission for user:sudo rabbitmqctl set_user_tags maxat maxat_tag
There are three kinds of operations in RabbitMQ: configure, write and read. Thesudo rabbitmqctl set_permissions -p maxat_vhost maxat ".*" ".*" ".*"".*" ".*" ".*"line means to grant all permissions. More info here - Optional commands for rabbitMQ:
To list users:
To shutdown node:sudo rabbitmqctl list_userssudo rabbitmqctl shutdown
celery.py:
- Create
celery.pyfile incelerydirectory with the connection credentials to the RabbitMQ:from __future__ import absolute_import from celery import Celery app = Celery('test_celery', broker='amqp://maxat:password123@localhost/maxat_vhost', backend='rpc://', include=['test_celery.tasks']) - Broker connection scheme:
amqp://[user]:[password]@[hostname]:[port]/[virtual_host] - The first argument of Celery is just the name of the project package.
- The
brokerargument specifies the broker URL. - The
backendargument specifies a backend URL. A backend in Celery is used for storing the task results. So if you need to access the results of your task when it is finished, you should set a backend for Celery. - The
includeargument specifies a list of modules that you want to import when Celery worker starts.
tasks.py
- Create tasks.py file:
from __future__ import absolute_import from test_celery.celery import app import time @app.task def longtime_add(x, y): print ('long time task begins') # sleep 5 seconds time.sleep(5) print ('long time task finished') return x + y - To add a function to the task queue we add a decorator:
app.task
run_tasks.py
- Create run_tasks.py file:
from .tasks import longtime_add
import time
if __name__ == '__main__':
 result = longtime_add.delay(1,2)
 # at this time, our task is not finished, so it will return False
 print('Task finished? ', result.ready())
 print('Task result: ', result.result)
 # sleep 10 seconds to ensure the task has been finished
 time.sleep(10)
 # now the task should be finished and ready method will return True
 print('Task finished? ', result.ready())
 print('Task result: ', result.result)
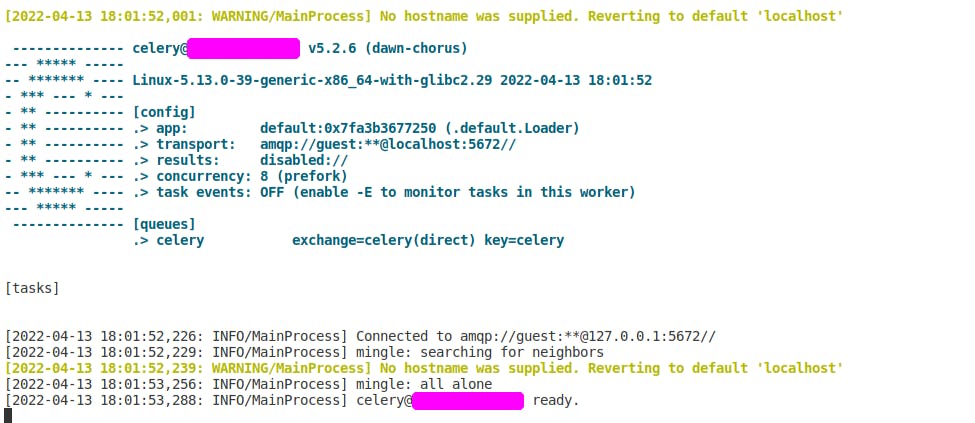
Start celery worker:
- Start celery worker with the most verbose flag
info:celery -A test_celery worker --loglevel=info - Output:

Run tasks
- Start another terminal window and run your tasks:
python3 -m test_celery.run_tasks - Output celery:

- Output of tasks run:


