


Docker builder
In Docker, a "builder" refers to a component or a set of processes responsible for turning your Dockerfile and associated files (the build context) into a Docker image. This process involves interpreting the Dockerfile commands, fetching the necessary base images, running the commands specified in the Dockerfile, and layering the results to create the final image.
Here are key points about the Docker builder:
Dockerfile Interpreter: The builder reads and interprets the Dockerfile, a text document containing all the commands a user could call on the command line to assemble an image.
Image Creation Process: The builder executes the steps in the Dockerfile, layer by layer. Each step in the Dockerfile adds a new layer to the image, with each layer representing a set of file system changes.
Context Processing: The builder takes a context as input. The context is typically a directory that includes the Dockerfile and any additional files needed to build the image (like application code, configuration files, etc.). The builder uses these files during the image creation process.
Layer Caching: Docker builders cache the results of each layer to speed up subsequent builds. If a layer hasn't changed since the last build, Docker reuses the cached layer instead of rebuilding it, which makes the build process faster.
Image Registry Interactions: The builder can also handle interactions with Docker registries. For example, it can pull base images from a registry and push the final image to a registry.
BuildKit as a Modern Builder: Docker introduced BuildKit as an improved builder with additional features like enhanced performance, better caching mechanisms, and new Dockerfile syntax capabilities. BuildKit is the default builder for users on Docker Desktop and Docker Engine v23.0 and later.
In essence, the builder in Docker is the mechanism that automates the process of creating Docker images from a Dockerfile and context, implementing the instructions specified by the user to produce a reusable and distributable container image.
Docker BuildKit overview
Docker BuildKit is an advanced and more efficient way of building Docker images. It's a feature included in Docker 18.09 and later versions, designed to improve the performance, flexibility, and security of Docker builds. Here's a breakdown of its key features:
Skipping Unused Build Stages: BuildKit intelligently detects and omits stages in your Dockerfile that aren't needed for the final build. This saves time by not executing unnecessary steps.
Parallel Building of Independent Stages: If your Dockerfile has multiple independent stages (like building different components), BuildKit can process these stages simultaneously. This parallelization speeds up the overall build time.
Incremental File Transfers: BuildKit is smart about transferring files. It only transfers the parts of your build context that have changed since the last build. This is more efficient than sending the entire build context every time, especially for minor changes.
Selective Context Transfer: Similar to incremental file transfers, BuildKit also avoids transferring files from your build context that aren't used in the build process. This reduces the amount of data sent during the build and speeds up the process.
Advanced Dockerfile Frontend Features: BuildKit supports new and advanced functionalities in Dockerfile syntax. This includes new commands and options that enable more efficient and powerful Dockerfile designs.
Isolated Side Effects: When using BuildKit, the side effects of a build process (like intermediate images and containers) are isolated from the rest of the Docker API. This leads to cleaner and more manageable builds, reducing clutter and potential conflicts.
Cache Prioritization for Pruning: BuildKit prioritizes which parts of your build cache are important to keep around. This is especially useful for automatically cleaning up or "pruning" your build cache, ensuring that valuable cache data is retained while discarding less useful data.
In summary, Docker BuildKit enhances the efficiency, speed, and flexibility of Docker builds. It achieves this through smart caching, parallel processing, incremental and selective file transfers, advanced Dockerfile features, isolated side effects, and intelligent cache management.
Setting up BuildKit
If you are running a version of Docker Engine version earlier than 23.0, you can enable BuildKit either by setting an environment variable, or by making BuildKit the default setting in the daemon configuration.
To set the BuildKit environment variable when running the docker build command, run:
$ DOCKER_BUILDKIT=1 docker build .
To use Docker BuildKit by default, edit the Docker daemon configuration in /etc/docker/daemon.json as follows, and restart the daemon.
{
  "features": {
    "buildkit": true
  }
}
If the /etc/docker/daemon.json file doesn't exist, create new file called daemon.json and then add the following to the file. And restart the Docker daemon.
Docker Build architecture
Docker Build implements a client-server architecture, where:
Buildx is the client and the user interface for running and managing builds
BuildKit is the server, or builder, that handles the build execution.
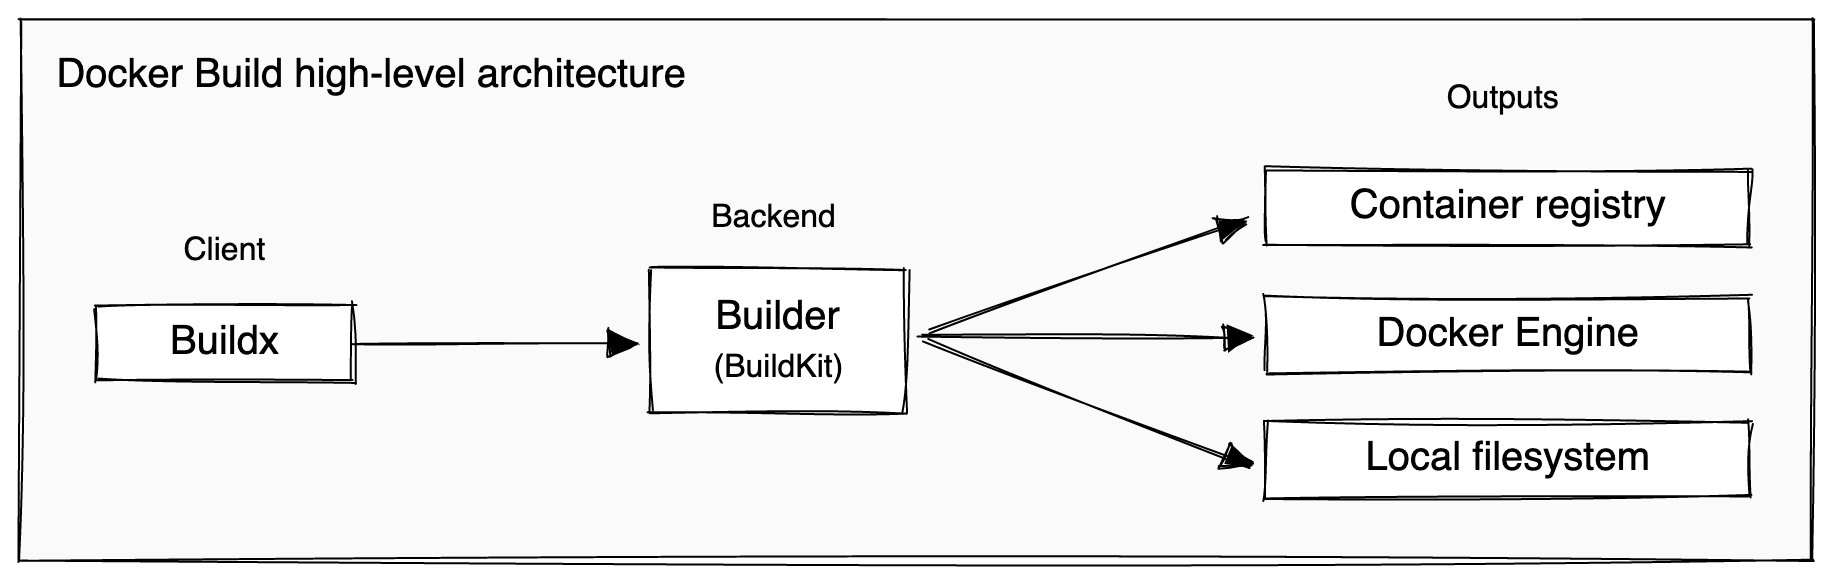
As of Docker Engine 23.0 and Docker Desktop 4.19, Buildx is the default build client.
BuildX
Buildx is a CLI tool that provides a user interface for working with builds. Buildx is a drop-in replacement for the legacy build client used in earlier versions of Docker Engine and Docker Desktop. In newer versions of Docker Desktop and Docker Engine, you're using Buildx by default when you invoke the docker build command. In earlier versions, to build using Buildx you would use the docker buildx build command.
Buildx is more than just an updated build command. It also contains utilities for creating and managing builders.
Docker Buildx is installed by default with Docker Desktop. Docker Engine version 23.0 and later requires that you install Buildx from a separate package. Buildx is included in the Docker Engine installation instructions, see Install Docker Engine.
You can also build the CLI plugin from source, or grab a binary from the GitHub repository and install it manually. See docker/buildx READMEopen_in_new for more information
Tutorial: Create Docker images with BuildKit and legacy builder
To explore and test the Docker BuildKit, you'll need to have Docker installed on your system.
Step 1: Enable Docker BuildKit
First, you need to enable Docker BuildKit. You can do this in two ways:
Environment Variable Method: Simply prefix your build command with
DOCKER_BUILDKIT=1. This is a temporary method and only applies to the current build.DOCKER_BUILDKIT=1 docker build .Docker Daemon Configuration: Edit the Docker daemon configuration file (typically located at
/etc/docker/daemon.json) to enable BuildKit by default. Add"features": {"buildkit": true}to the configuration file.{ "features": { "buildkit": true } }After editing, restart the Docker daemon to apply the changes.
Step 2: Create a Sample Dockerfile
Create a Dockerfile to test the build process. Here's a simple example using a Python base image:
Create a directory for your Docker project:
 mkdir docker-buildkit-test
 cd docker-buildkit-test
Create a
Dockerfilein this directory:# syntax=docker/dockerfile:1 FROM python:3.8-slim WORKDIR /app COPY . . RUN pip install -r requirements.txt CMD ["python", "./your-script.py"]Add a simple Python script (e.g.,
your-script.py) and arequirements.txtfile. Let's create a simple Python script and a correspondingrequirements.txtfile for a Docker setup. We'll make a basic Python script that prints a message, and for demonstration purposes, we'll use a common library likerequestsin therequirements.txtfile.Python Script (
your-script.py)# your-script.py import requests def fetch_data(): response = requests.get('https://api.github.com') return response.json() def main(): print("Hello from Docker!") data = fetch_data() print("Fetched data:", data) if __name__ == "__main__": main()This script prints a welcome message, then makes a simple HTTP GET request to GitHub's API and prints the fetched data.
Requirements File (
requirements.txt)requestsThis file lists the
requestslibrary, which our Python script uses to make HTTP requests.
Step 3: Build the Image Using BuildKit
Now build the Docker image using the BuildKit. If you've enabled BuildKit in the Docker daemon configuration, just run:
docker build -t your-image-name .
If you're using the environment variable method:
DOCKER_BUILDKIT=1 docker build -t your-image-name .
Observe the build process. You should notice improvements in the build performance, especially in caching and parallel execution of build steps.

Step 4: Compare with Traditional Docker Build
For comparison, you can disable BuildKit (if it's enabled in the daemon configuration) and run the build command again:
DOCKER_BUILDKIT=0 docker build -t your-image-name .

This will allow you to compare the build times and performance between the traditional build process and the one with BuildKit.
Remember, BuildKit is designed to be backward compatible, so your existing Dockerfiles should work without modifications.
Clean Up Docker Images
Remove All Docker Images: This command removes all Docker images from your system.
docker rmi -f $(docker images -aq)