


Cross-Origin Resource Sharing (CORS) is a security feature implemented in web browsers to control how web pages in one domain can make requests to resources in a different domain. It's a part of the broader security policy called the Same-Origin Policy (SOP), which is designed to safeguard users from malicious web content.
Before diving deep into the details of CORS, lets understand what does "origin" means in the context of Web Security.
What is origin?
In the context of Web Security and CORS (Cross-Origin Resource Sharing), the term "origin" is a fundamental concept used to determine whether a particular web page is allowed to access resources from a server on a different domain. An origin is defined by the combination of three elements: the scheme (protocol), the host (domain), and the port.

Scheme (Protocol): This is the method used to access a resource on the Internet, such as HTTP or HTTPS.
Host name (Domain): This is the domain name of the website, like
example.com.Port: This is the network port used to access the resource. Common ports include 80 for HTTP and 443 for HTTPS. If a port isn't specified in the URL, it defaults to these standard ports for the respective protocols.
Same Origin vs Different Origin
Two URLs have the same origin only if all three of these components (scheme, host, port) are identical. Otherwise, they are considered different origins.
Examples of Same Origin:
http://example.com/page1andhttp://example.com/page2- Same protocol (http), same domain (
example.com), and implicitly the same port (80, the default for http).
- Same protocol (http), same domain (
https://example.com:443/andhttps://example.com/contact- Same protocol (https), same domain (
example.com), and the same port (443, the default for https).
- Same protocol (https), same domain (
Examples of Different Origin
http://example.comandhttp://www.example.com- Different hosts (
example.comvswww.example.com).
- Different hosts (
https://example.comandhttp://example.com- Different schemes (https vs http).
http://example.comandhttp://example.com:8080- Different ports (default 80 vs 8080).
http://example.comandhttp://example.org- Different domains (
example.comvsexample.org).
- Different domains (
What is Same-Origin Policy (SOP)?
The Same-Origin Policy (SOP) is a critical security concept in web application development. It's a policy enforced by web browsers to prevent potentially malicious scripts on one origin from interacting with resources from another origin. This policy is foundational to web security, as it helps to protect users' data from various types of web-based attacks.
Key Elements of SOP:
Definition of Origin: As mentioned earlier, an origin is defined by the combination of the scheme (protocol, e.g., HTTP or HTTPS), the host (domain), and the port. SOP considers URLs with the same scheme, host, and port as having the same origin therefore allowing client browser to make these kind of requests.

Restrictions Imposed by SOP:
Document Object Model (DOM) Access: SOP restricts a script running on a web page from accessing the DOM of another page if they have different origins. This means a script from
http://example.comcannot read or modify the DOM of a page fromhttp://different.com.
AJAX Requests: JavaScript code using XMLHttpRequest or Fetch API is typically restricted to sending requests only to the same origin the script was loaded from. Attempts to send requests to a different origin are blocked unless explicitly allowed by the server via CORS.
Cookies and Storage: SOP also prevents scripts from accessing cookies and local storage associated with another origin. This is crucial for maintaining session security and user privacy.
Exceptions and Workarounds:
Cross-Origin Resource Sharing (CORS): As an exception to SOP, CORS allows servers to specify who can access their resources and under what conditions. It uses HTTP headers to tell the browser to allow web applications from one origin to access resources from another origin.
JSONP (JSON with Padding): Before CORS, JSONP was a common method to bypass SOP restrictions. It involves loading a script from a different origin by dynamically adding a
<script>tag to the DOM.postMessage() API method: This API method allows secure cross-origin communication between Window objects, such as iframes, pop-ups, or tabs.
Security Implications: SOP is essential for preventing security issues like Cross-Site Scripting (XSS) and Cross-Site Request Forgery (CSRF). By restricting how scripts can interact with resources from other origins, it adds a layer of protection for user data and privacy.
Evolution and Support: Over the years, SOP has evolved to adapt to the increasing complexity of web applications. Modern browsers are equipped with robust mechanisms to enforce SOP while providing ways (like CORS) to safely relax these restrictions when necessary.
The Same-Origin Policy is a foundational security mechanism in web browsers that restricts web pages from interacting with resources from different origins. Its primary goal is to protect user data and prevent malicious scripts from compromising web interactions.
What is Cross-Origin Resource Sharing (CORS)?
Cross-origin resource sharing (CORS) is an extension of the same-origin policy (SOP) that enables controlled access to resources located outside of a given domain. A web page or a web app on a given domain may freely embed cross-origin images, stylesheets, scripts, iframes, and videos.
Here's a breakdown of the key aspects of CORS:
The Need for CORS
While SOP is crucial for security, there are legitimate reasons for a web page to request resources from a different domain. For example, modern web applications often need to interact with resources from different domains, such as:
Fetching data from third-party APIs
Loading images or fonts from external sources
Embedding content from other websites (e.g., videos, social media posts)
How CORS Works
CORS allows servers to specify who can access their assets and under what conditions. When a web browser makes a cross-origin request (such as an HTTP request to load an image, make an AJAX call, etc.), it sends an HTTP request to the server hosting the resource. This request includes an Origin header that indicates the domain of the requesting page.
CORS is a security feature, not a vulnerability. It allows web developers to relax the SOP under controlled conditions. However, configuring CORS incorrectly can expose a website to risks like data theft or malicious attacks.
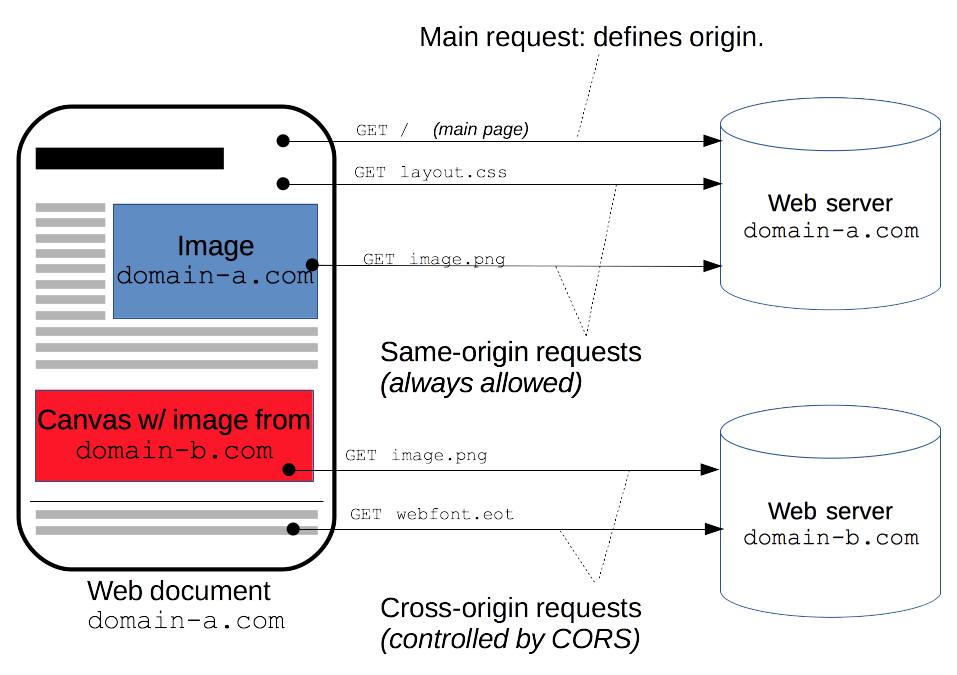
Image credits: MDN
Preflight Request (for non-simple requests):

Before making a potentially sensitive request (e.g., using methods like PUT, DELETE, or custom headers), the browser sends a preflight request (using the OPTIONS method) to the server.
The server responds with CORS headers indicating whether the cross-origin request is allowed and any restrictions. For example, a client browser might be asking a server if it would allow a
DELETErequest, before sending aDELETErequest, by using a preflight request:OPTIONS /resource/foo Access-Control-Request-Method: DELETE Access-Control-Request-Headers: origin, x-requested-with Origin: https://foo.bar.orgIf the server allows it, then it will respond to the preflight request with an
Access-Control-Allow-Methodsresponse header, which listsDELETE:HTTP/1.1 204 No Content Connection: keep-alive Access-Control-Allow-Origin: https://foo.bar.org Access-Control-Allow-Methods: POST, GET, OPTIONS, DELETE Access-Control-Max-Age: 86400Actual Request:
If the preflight request is successful, the browser sends the actual cross-origin request with the necessary CORS headers (Step 4).
The server checks the CORS headers and either allows or blocks the request (Step 5).
Browser's Role:
The browser enforces CORS. After receiving the server's response, the browser checks the CORS headers (Step 3). If the server's response indicates that the request is allowed, the browser proceeds with the request. If not, the browser blocks the request, and the web page cannot access the resource.
Key CORS Headers
The server checks the Origin header against its CORS policy. If the request is allowed, the server responds with the appropriate CORS headers, such as Access-Control-Allow-Origin. This header tells the browser whether the requesting domain is permitted to access the resource.
The key CORS Headers:
Access-Control-Allow-Origin: Specifies which origins are allowed to make cross-origin requests.
Access-Control-Allow-Methods: Lists the allowed HTTP methods for cross-origin requests.
Access-Control-Allow-Headers: Lists the allowed headers for the actual request.
Access-Control-Max-Age: Specifies how long the preflight response can be cached by the browser.
Workshop 1: CORS Essentials with Python Flask
In this workshop, we'll use Python for the server side and simple HTML and JavaScript for the client side. This workshop assumes basic knowledge of Python, HTML, and JavaScript. All testing is done locally.
Step 1: Setting Up the Environment
Ensure Python3 is installed on your system. You can download it from python.org.
Step 2: Creating the Server
Install Flask: Flask is a lightweight web framework for Python. Install it using pip:
pip3 install Flask Flask-CORS💡Flask-CORS - A Flask extension for handling Cross Origin Resource Sharing (CORS), making cross-origin AJAX possible.Create a Python File for the Server: Name it
server.py.Write the following code in
server.py:from flask import Flask from flask_cors import CORS app = Flask(__name__) CORS(app) # This will enable CORS for all routes @app.route('/') def home(): return "Hello, CORS-enabled world!" if __name__ == "__main__": app.run(debug=True)This code creates a basic Flask server with CORS enabled for all routes.
Step 3: Running the Server
Run your server:
python3 server.pyThe server will start on
localhostat port5000(http://127.0.0.1:5000/).
Step 4: Creating the Client Side Application
Create an HTML File: Name it
index.html.Client Code: Write the following HTML and JavaScript in
index.html:<!DOCTYPE html> <html> <head> <title>CORS Test</title> <script> function makeRequest() { fetch('http://127.0.0.1:5000/') .then(response => response.text()) .then(data => alert(data)) .catch(error => alert('Error: ' + error)); } </script> </head> <body> <h1>CORS Test</h1> <button onclick="makeRequest()">Make Request</button> </body> </html>
Step 5: Testing CORS
Open the HTML File in a Browser: This is your client application.
Click the 'Make Request' Button: This will trigger a JavaScript fetch request to your Flask server.

What to Expect
If CORS is set up correctly, you should see an alert with the message "Hello, CORS-enabled world!".

If you disable CORS in your Flask server by commenting out
CORS(app)and reload the server, the browser will block the request, and you should see an error in the alert.
Workshop 2: Allow Specific Origins
You can specify which origins are allowed to access your server. This is useful if you want to restrict access to known and trusted websites.
Modify server.py to include:
from flask import Flask
from flask_cors import CORS

app = Flask(__name__)
cors = CORS(app, resources={r"/*": {"origins": "http://127.0.0.1:8000"}})  # Only allow requests from "http://127.0.0.1:8000/"

@app.route('/', methods=['GET'])
def home():
    return "Hello, CORS-configured world!"

if __name__ == "__main__":
    app.run(debug=True)
This configuration will only allow CORS requests from the origin http://localhost:8000.
To send a request from http://localhost:8000 to your Flask server configured for CORS, you need to set up a simple web server on localhost running on port 8000 and create a client-side application (like an HTML page with JavaScript) that makes the request. Here's how you can do it:
Step 1: Set Up a Simple Web Server
You can use Python's built-in HTTP server for this.
Create a Directory: Make a new directory for your web server, let's call it
web_clientand navigate to it.Start the Server: Run the following command to start a simple HTTP server on port 8000:
For Python 3.x:
python -m http.server 8000
Step 2: Create a Client-side Application
Create an HTML File: Inside the
web_clientdirectory, create an HTML file namedindex.html.Add HTML and JavaScript: Edit
index.htmlto include the following content:<!DOCTYPE html> <html> <head> <title>CORS Test Client</title> <script> function makeCORSRequest() { fetch('http://127.0.0.1:5000/') // URL of your Flask server .then(response => response.text()) .then(data => alert(data)) .catch(error => alert('CORS Error: ' + error)); } </script> </head> <body> <h1>CORS Request Test</h1> <button onclick="makeCORSRequest()">Make CORS Request</button> </body> </html>This HTML file contains a button that, when clicked, makes a fetch request to your Flask server.
Step 3: Test the CORS Configuration
Open Your Web Browser: Navigate to
http://localhost:8000. You should see your HTML page with the "Make CORS Request" button.Click the Button: This action will attempt to make a request to your Flask server at
http://127.0.0.1:5000/.Observe the Behavior:
If CORS is configured correctly on your Flask server to accept requests from
http://localhost:8000, the fetch should succeed, and you'll see the server's response.
If the CORS configuration does not allow requests from this origin, the browser will block the request, and you'll see a CORS error.
This test will demonstrate how CORS works in a real-world scenario, showing how the browser restricts or allows cross-origin HTTP requests based on the server's CORS configuration.