


A Delivery Plan in Azure DevOps provides a holistic view of the work planned across multiple teams and projects. It's a tool within Azure DevOps that helps teams align on their goals, schedules, and the overall progress of their projects. By visualizing work items across a timeline, the Delivery Plan makes it easier to see how work is distributed over time, understand dependencies between different teams or projects, and identify potential bottlenecks or overlaps in schedules.
Key Components
Work Items: These are the tasks, features, bugs, or any other pieces of work that teams need to complete. In a Delivery Plan, work items are visualized on a timeline.
Iterations: These are the time frames (sprints) that teams work within. Delivery Plans show these iterations across the timeline, helping you see what work is planned for each sprint.
Teams and Projects: Delivery Plans can span multiple teams and projects within an Azure DevOps organization. This is particularly useful for coordinating efforts across different groups.
Progress Tracking: Each work item on the plan displays its current state, allowing teams to track progress directly from the Delivery Plan.
Dependencies: Work items can be linked to show dependencies. This helps in identifying critical paths and coordinating work that relies on the completion of other tasks. Dependencies between work items are shown with

red icons.
Benefits
Alignment and Visibility: Provides a single view that consolidates the work across teams and projects, improving alignment and visibility.
Planning and Coordination: Facilitates better planning and coordination by visualizing overlaps, dependencies, and distribution of work.
Track Progress: Offers a convenient way to monitor the progress of work items across iterations, helping to ensure projects stay on track.
Customization: Delivery Plans are customizable. You can filter what you see based on teams, work item types, tags, and more, allowing you to tailor the view to your specific needs.
Example of Usage
Let's consider a fictional software company named CloudTech Innovations that specializes in developing cloud-based solutions for the finance sector. CloudTech Innovations has recently embarked on an ambitious project to develop a new financial analysis platform called FinInsight. The project is complex, involving multiple teams working on different components of the platform, such as the core analytics engine, user interface, data security, and compliance modules.
Scenario Overview
CloudTech Innovations is structured into four main development teams:
Analytics Engine Team: Responsible for developing the core algorithms that drive financial analysis.
User Interface (UI) Team: Focuses on creating an intuitive and responsive user interface for FinInsight.
Data Security Team: Ensures that all financial data processed by FinInsight is secure and complies with industry standards.
Compliance Team: Works on ensuring the platform meets all regulatory requirements in the finance sector.
Challenge
The main challenge CloudTech Innovations faces is coordinating work across these teams to ensure the timely and cohesive development of FinInsight. Each team has its sprints and milestones, but the dependencies between their tasks make isolated planning inefficient. For example, the UI Team needs the Analytics Engine Team to complete certain algorithms before they can integrate them into the user interface. Similarly, the Compliance Team needs to review features as they are developed to ensure they meet regulatory standards.
Solution: Implementing a Delivery Plan
CloudTech Innovations decides to implement a Delivery Plan in Azure DevOps to address these challenges. Here's how the Delivery Plan helps:
Visualizing Work Across Teams: By creating a Delivery Plan, CloudTech Innovations can visualize all the work items from the Analytics Engine, UI, Data Security, and Compliance Teams on a unified timeline. This visibility helps identify when each team plans to deliver their components of FinInsight.
Identifying Dependencies: The Delivery Plan makes it easier to spot dependencies between tasks. For instance, it becomes clear that the UI Team’s work on the dashboard feature depends on the Analytics Engine Team’s completion of certain data processing algorithms.
Aligning Sprints and Milestones: With the Delivery Plan, CloudTech Innovations can align sprints and milestones across teams. This alignment ensures that all teams are working towards the same deadlines, which is critical for the integrated development of FinInsight.
Tracking Progress: The Delivery Plan allows CloudTech Innovations to track the progress of work items in real-time. If a task is falling behind, it's immediately visible, and the company can take corrective action, such as reallocating resources or adjusting timelines.
Improving Communication: The Delivery Plan serves as a central point of communication for all teams. It reduces the need for frequent status meetings and emails, as teams can see each other’s progress and understand how their work fits into the broader project timeline.
Outcome
By using the Delivery Plan in Azure DevOps, CloudTech Innovations improves coordination and efficiency in the development of FinInsight. The company manages to navigate the complexities of the project more smoothly, with reduced delays and bottlenecks. The Delivery Plan ensures that everyone is aligned towards the common goal, leading to a successful launch of the FinInsight platform within the planned timeframe.
Summary
For CloudTech Innovations, the Delivery Plan became an essential tool for managing their project's complexities. It not only facilitated better planning and coordination but also fostered a culture of transparency and collaboration across the organization, ultimately contributing to the project's success.
Workshop: Plan a sprint using Delivery Plans
As the prerequisite for this workshop you need to have Azure DevOps Ogranization. If you don't have you can run the template "Run the template" that automatically sets the organization for you.

To learn more, see Set up your environment.
Create a delivery plan
In this workshop we will use fictitious team "Tailspin" that already have two teams with sprints set up in Azure DevOps, so now they can review and optimize the work schedules.
You create a delivery plan from the Delivery Plans tab of Azure Boards. You can create as many delivery plans as you need to manage different aspects of your organization.
From Azure DevOps, navigate to your project.
Under Boards, select Delivery Plans.
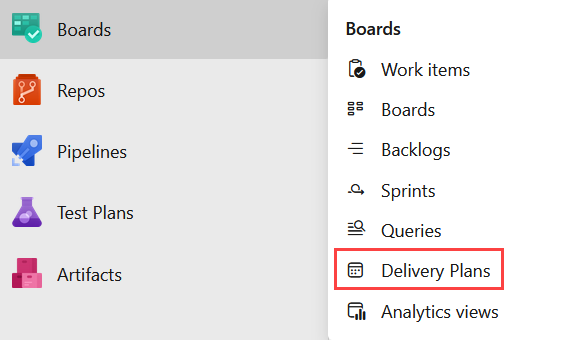
Select New plan.
In the form, enter these fields:
Name: Space Game Delivery Plan.
Select the Backlog items backlog for the Space Game Web Team.
Add the Space Game Engine Team's Backlog items backlog using the Add team option.
The Web team and the Engine team share a common set of backlog items.
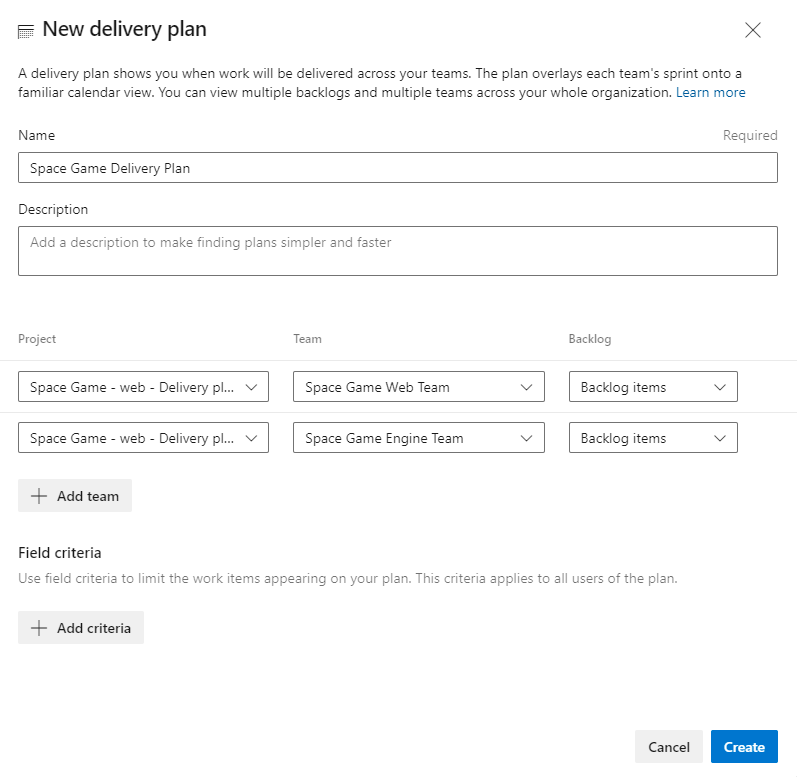
Select Create.
💡Note: The team project generated for this module uses the Scrum process, not the Basic process. While the Basic process uses Issues, the Scrum process uses Backlog items, which are functionally the same. You can use Delivery Plans with either process.
Add schedule milestone markers
Milestone markers can be added to the delivery plan as reference points. They help you plan work within the context of significant or external dates. Let's add a few markers now. To do so:
Select your delivery plan.
In the top right toolbar, select Settings, and then, on the Plan settings pane, select Markers.
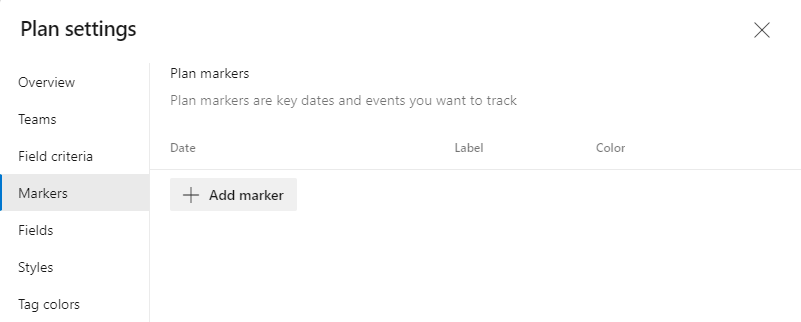
From the Markers tab, select Add marker.
In the form, enter these fields:
Date: Select a date one week from now
Label: Cliffchella
Color: Red
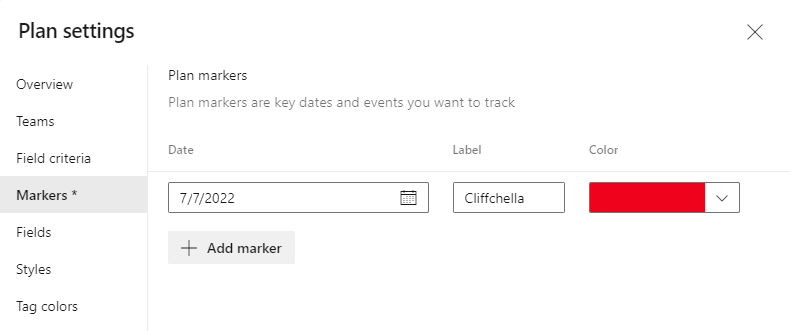
Repeat the process to add markers with labels, dates, and colors:
Beta: five weeks from today (blue)
Annual company party: six weeks from today (green)
Select Save.
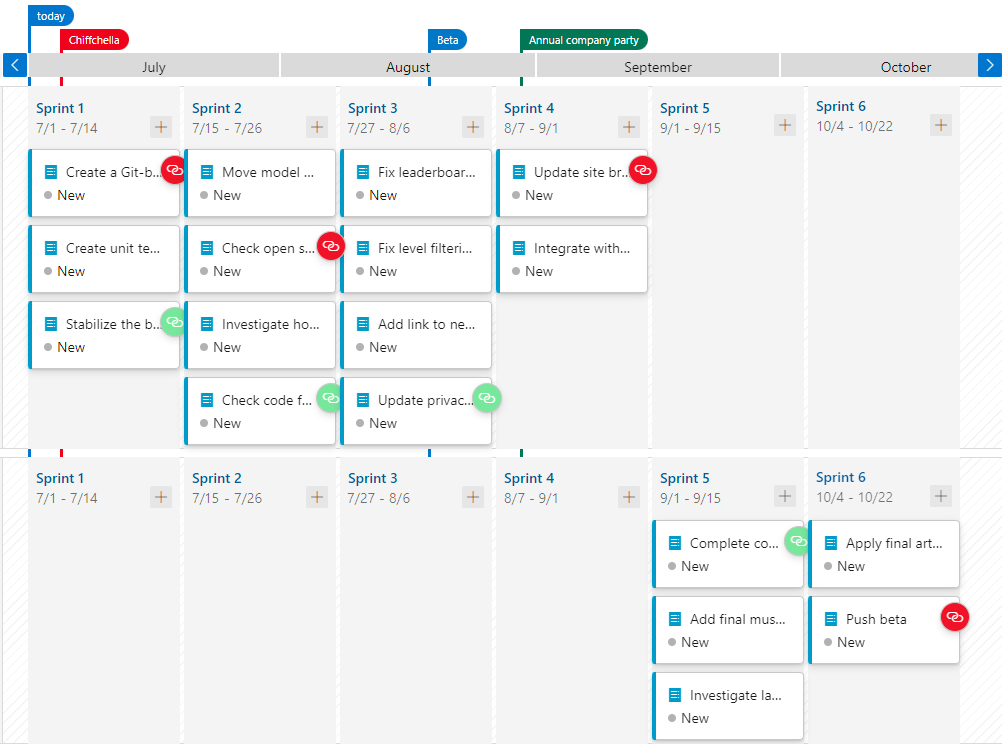
Use the Scroll calendar and Zoom out controls to bring all markers into view.
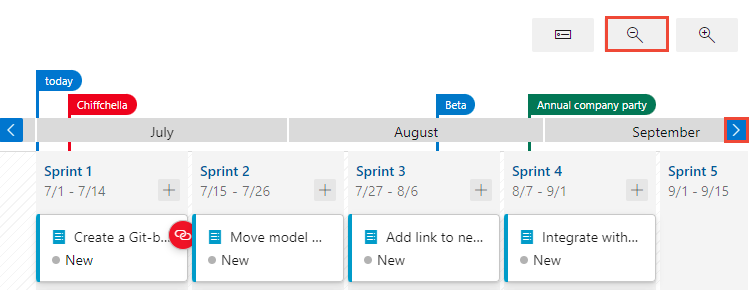
Select the Beta marker at the top of the design plan. A solid line shows the boundary of the beta milestone.
Optimize the work schedule
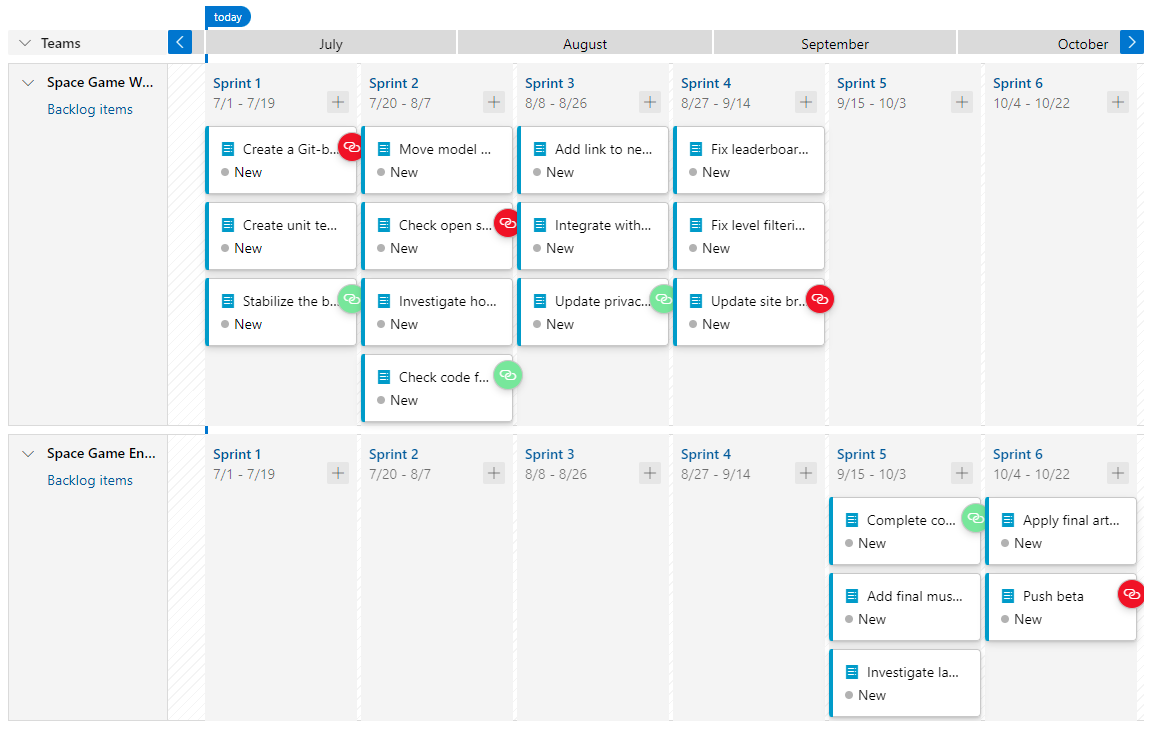
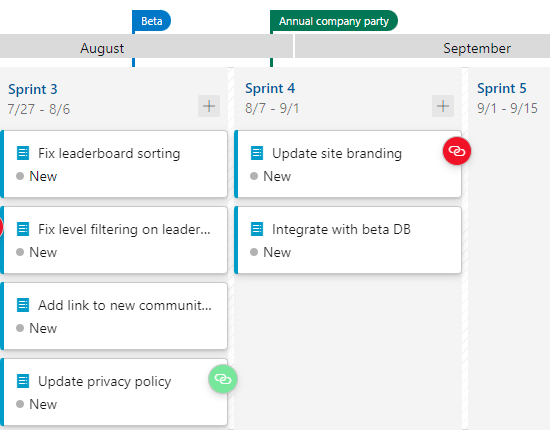
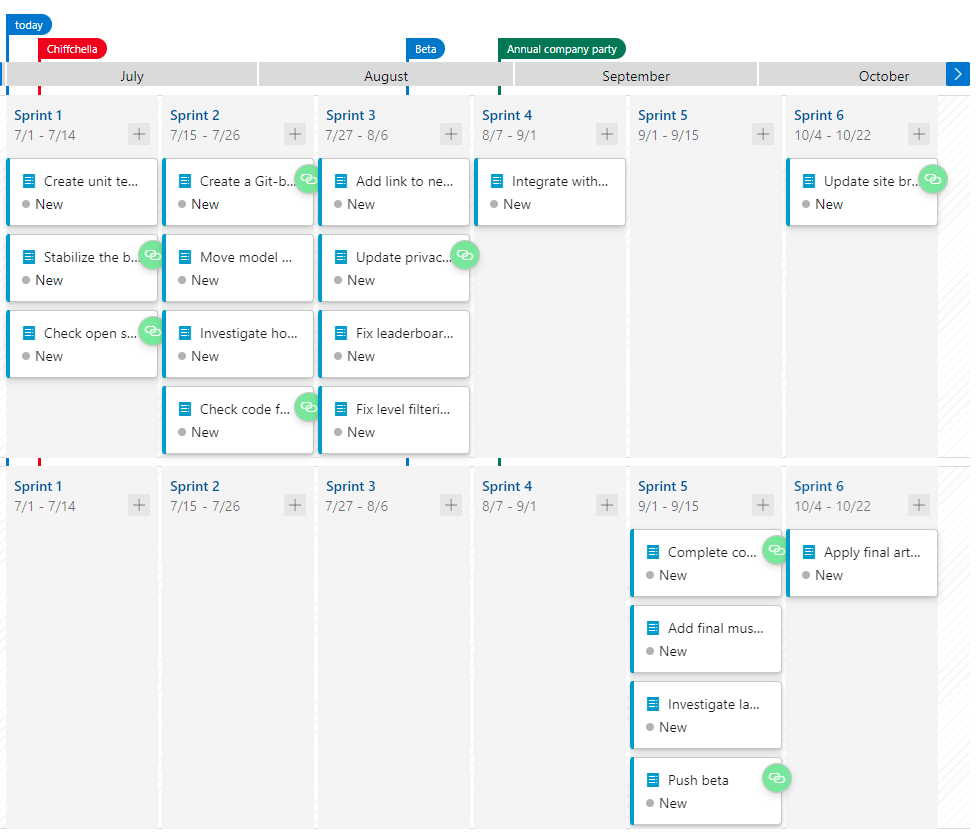
Notice that there's a work item for the Web team to Integrate with beta DB that's scheduled to be completed before the beta will be ready. This is a problem because this work item is dependent on that beta.
Drag the integration work item from Sprint 3 to Sprint 4 to ensure that its dependency will be available.
This change opens a significant amount of bandwidth in Sprint 3. Because that time is now available for productive work, drag the two Fix work items from Sprint 4 back into Sprint 3.
Your final sprint plan should look similar to this:
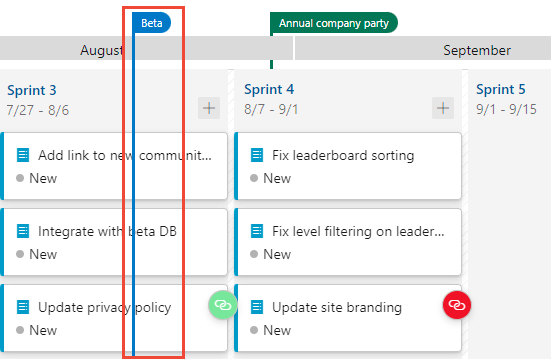
Although the team has made some adjustments, they haven't addressed all the dependency issues that are identified in the delivery plan.
View work items with dependencies
The first thing the team notices when they open the delivery plan is that link icons appear. Cards with a
![]()
green icon indicate there are no dependency issues. Cards with a
![]()
red icon indicate there are issues with one or more dependencies.
Dependency issues arise when a predecessor work item is scheduled to finish after a successor work item.
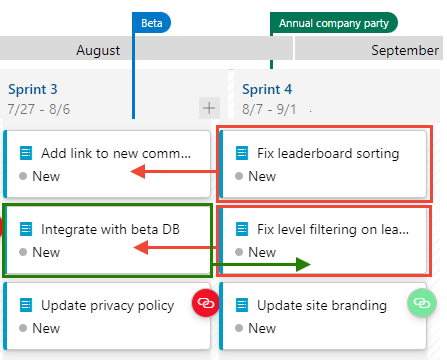
View lines linking work items with dependencies
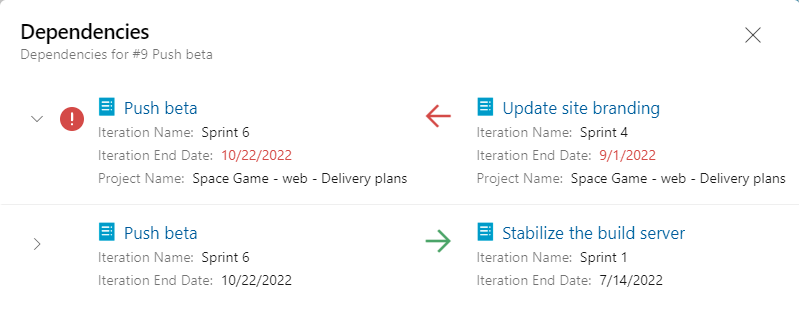
To view the work items that share in a dependency, select the card with an icon attached. Here, we select the Update privacy policy card.
A link appears that indicates which work item is participating in the dependency. In this case, it highlights that the Complete community interaction training work item for the Engine Team. The arrow indicates the direction of the dependency, and the black line reinforces that there's no issue.
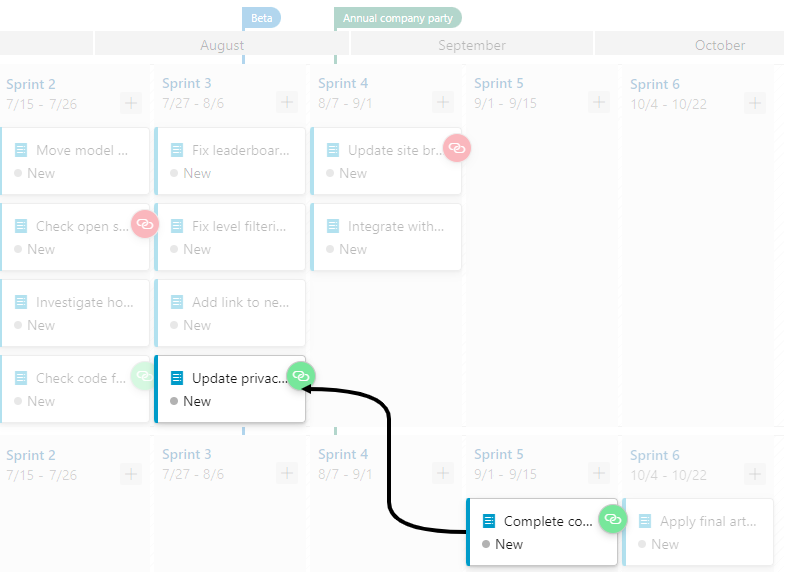
To dismiss the dependency line, select the card or anywhere in the view.
Now, choose a card with an issue. Here we select Update site branding. An issue is shown with the link to the Push beta item defined for the Engine Team. The red line indicates there's an issue and the arrow indicates that the Push beta item is scheduled to complete after Update site branding, which depends on it being completed first.
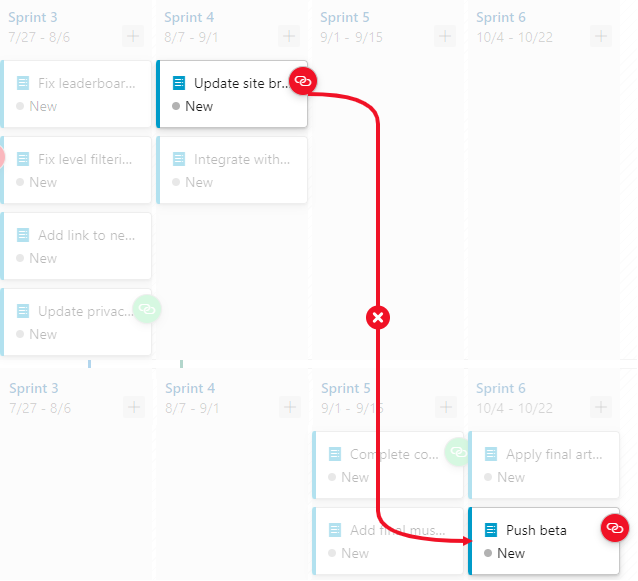
Open the dependency dialog
To review details of the Push beta work item, choose the card's icon to open the Dependencies dialog. The first dependency indicates an issue where the Update site branding work item requires the Push beta work to be completed first. The second dependency listed shows no issue.
Resolve dependencies that have issues
The team decides to change the order in which to complete selected work items so as to resolve the dependency issues. They perform the following actions:
Web team:
Drag Create a Git-based workflow card from Sprint 1 to Sprint 2.
Drag Check open source code for vulnerabilities and licensing terms card from Sprint 2 to Sprint 1.
Drag Update site branding card from Sprint 4 to Sprint 6.
Engine team:
- Drag Push beta card from Sprint 6 to Sprint 5.
Once these changes have been made, the team sees that all dependency issues have been resolved.
Management can feel confident that work will progress without foreseeable delays. Now, instead of waiting on dependencies to be delivered, teams will always have productive work to take on. Sure, things might change as circumstances develop, but at least now everyone knows where to go to stay up to date.
Optional - Delete your project
This module provided a template that you ran to create a clean environment for the module.
Delete your Azure DevOps project, including what's in Azure Boards.
To delete the project:
In Azure DevOps, go to your project. Earlier we recommended that you name this project Space Game - web - Delivery plans.
Select Project settings in the lower corner.
At the bottom of the Project details area, select Delete.
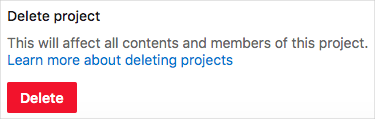
In the window that appears, enter the project name, and then select Delete again.
Your project is now deleted.